The latest version of this document can be found at www.broad.ology.org.uk/amiga/sketchblock/erasetool.html
SketchBlock 3.4 - Digital Sketching For The Amiga (SVN: 386:520M)
Erase Tool
The erase tool enables parts of a layer to be erased. If the layer has an alpha channel then erase sections become transparent, if it does not then erased sections are effectivelt painted with the background colour.
Erase Tool Settings
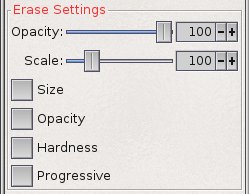
When the Erase tool is active the settings for the tool can be modified via the settings panel in the Tools Window.(Shown Right)
The following attributes can be controlled.
- Opacity: The degree to which the eraser removes the existing image is controlled by the opacity. Opacity varies from 0 to 100% with 100% completely covering the original, and 0% being completely transparent and making no change to the image. Values can be adjusted using the slider or directly entering a number into the adjacent integer gadget.
- Scale: The size of the working brush can be scaled from 0% to 500%. So a 10 pixel brush would vary from 0 to 50 pixels. In reality the smallest allowable size is 1 pixel. Ofcourse when the brush is scaled down that small not antialiasing efects can be used, but it can still be useful for fine precision work. Again as with the opacity settings, the value can be adjusted both by slider and interger gadget.
- Pressure: The next four switches affect the behaviour of the erase tool when a tablet with pressure sensitivity is used.
- Size: Checkmarking this box will enable size sensitivity. The size of the brush will vary from 10% of the brush size up to 100% when pressing with maximum pressure. This sizing is applied in addition to the scaling set above, so give very fine control of the brush size.
- Opacity: Checkmarking this will enable the opacity to be varied with pressure, again in a range from 10% up to 100% of the value set with the opacity slider.
- Hardness: If the brush type supports it the hardness of the edge of the brush will vary with tablet pressure. The effect is quite subtle and most noticable if the brush itself is quite hard to start with.
- Progressive: If the progressive switch is enabled, then the erased area builds up as the stylus / mouse moves back and forth during the same stroke, ie with lifting the stylus or releasing the left mouse button. For the effect to be noticable the opacity slider must be set to less than 100%. With a very low opacity and repeated strokes a very subtle gradient of colour intensity can be obtained.
Erase Tool ARexx Commands
To pass ARexx commands to the Paint tool you must use the SketchBlock ARexx command COMMANDTOOL
SET
PRESSURESIZE/S,PRESSUREOPACITY/S,PRESSUREHARDNESS/S,PROGRESSIVE/S,OPACITY/N/A,SCALE/N/A
Sets the Erase settings to the provided values. All the settings are updated so all required terms must be specified.
- PRESSURESIZE/S
- If present this switch enables pressure sensitive size. If not present it disables pressure sensitive size.
- PRESSUREOPACITY/S
- If present this switch enables pressure sensitive opacity. If not present it disables pressure sensitive opacity.
- PRESSUREHARDNESS/S
- If present this switch enables pressure sensitive hardness. If not present it disables pressure sensitive hardness.
- PROGRESSIVE/S
- If present this switch enables progressive painting. If not present it disables progressive painting.
- OPACITY/N/A
- This sets the opacity of the erase stroke, it takes a value from 0 to 100
- SCALE/N/A
- This sets the scaling of the erase stroke, it takes a value from 0 to 500 (although the smallest resulting brush size is always 1 pixel square)
GET
STEM/K
Retrieves the current settings via a STEM varaible.
- STEM/K
- Pass the variable to which the settings will be added. The values will be added to the stem variable useing the name above with no index component. eg If the STEM var was FOO pressure size will be added as FOO.PRESSURESIZE
The latest version of this document can be found at www.broad.ology.org.uk/amiga/sketchblock/erasetool.html